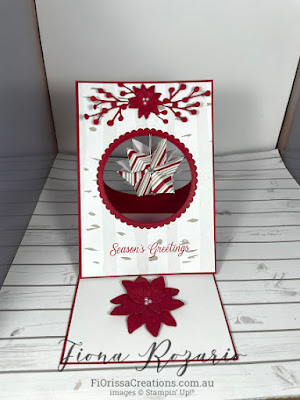
This is projects number 10 & 11, I made this Christmas Easel card on my Facebook live yesterday.
My card base was from Real Red cardstock measuring 5 7/8" x 4 1/4", score the front at 2 15/16 " for the easel.
Layer 1 Real Red cardstock measuring 5 3/4" x 4 " and the Peaceful Prints DSP layer , I used the now retired layering circles to cut the centre out, as crafters we don't throw away anything and I was able to make project number 11 with the cut outs.
I die the small poinsettia x 2 using the Poinsettia dies and the tiniest poinsettia I die cut 3 and 2 sprigs of Holly. As shown in the picture above I glued the two small Poinsettias offsetting the poinsettia and then finishing it off by adding the tiniest poinsettia again offsetting it and embellished with Pearl Basic jewels. I did the same with the two tiny poinsettias and adhered it with the two sprigs under the tiny poinsettia.
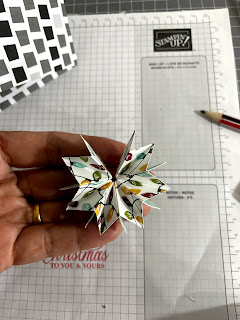
For the Star ornament, I cut 6 DSP squares measuring 1 1/2 " x 1 1/2", I folded it in half and then half again and once then diagonally, here is the
video, for demonstration purposes I used a 6 x6 piece of patterned paper.
Once you have all the 6 pieces folded into a small little square adhere each square till you get a stack of squares that looks something like this
Before you glue the last two squares together you need to attach a piece of fishing line with glue dots and then stick the two squares together to form the star.
Now to put the card together, adhere layer 1 to the lower fold of the card base, then attach the star ornament with a glue dot in the centre of the circle and then adhere the DSP layer on top . Below is a picture of two cards that I made.
For Project number 11, I used the scrap circles that were cut out from the card and made a gift tag, as crafters we never throw away anything do we, so here it is a quick and simple gift tag from the scraps of the card above. I punched out the Deer from the Peaceful Prints DSP and embellished with a ribbon bow, I coloured the white crinkled seam binding ribbon with the dark Real Red Stampin Blends and adhered it with a glue dot. I stamped Merry Christmas with Versamark and heat set it with white emboss powder.
Thank you for stopping by, I will be back with my final Christmas project, next Friday, as I plan to do it on my Facebook live.
Till then take care and stay safe,
Cheers,
Fiona


 Specialty Designer Series Paper")
")


 Crinkled Seam Binding Ribbon")


No comments:
Post a Comment